Creating a Self-Hosted CDN to Increase Page Speed
A self-hosted CDN for WordPress with W3 Total Cache will help make your site faster. Lowering the time it takes pages to load gets users into your content and engaged much quicker.
You probably didn’t realize but it’s actually possible with most hosting services to make your own CDN. Normally when you think of a content delivery network you imagine an entire network of servers . That’s exactly how the premium ones work.
A self-hosted CDN could be housed on many different servers too – but it’s commonly only in a single location. A more descriptive term for this kind of use would be as a statics domain.
As soon as you have a self-hosted CDN to serve your static files from you’re pagespeed scores will go up instantly because you’ll benefit from parallel connections in the browser & cookieless serving of the files.
What is a CDN & what are the Benefits?
A CDN is a Content Delivery Network. A set of quick servers dotted around the globe that your static resources get served from.
Static resources are things like image files, video, CSS & JS files and font files. That means all your uploads as well as a bunch of your theme files and the WP core is static. Those can all be served from a CDN. Once your files are on the CDN then you just need to rewrite the file location to point to the new domain.
There’s 2 main ways you can propagate files to a CDN. Origin push or origin pull.
Origin push requires that you send the files before you rewrite the file location to point to the new domain. If you don’t push all files to the CDN then the user will get a 404 when requesting the files from it.
Origin pull does not require you to add the files to the new location before rewrite. That’s because when it receives a request for a file that it doesn’t have it requests it from the origin server and pulls it over it’s self. It then saves a copy to use next time the file is requested.
Origin push techniques are usually less technical than origin pull so we’ll be adding our content via a push.
Serving static resources from a CDN accomplishes 3 things. When all done together they could potentially improve your page loading speeds dramatically.
- You content is loaded from the nearest server to the request, lowering ping timeand getting it to the user faster.
- Your static content is loaded from a separate domain to your dynamic content. This increases speed by allowing you to have more connections at once. There’s a limit to how many requests you make per connection so if it’s all coming from a single domain then there is a slight delay to the time you can make the request.
- A CDN serves everything from a cookieless domain so there’s no overheads involved in the download, you just get the resource and nothing else.
The big benefit of using a premium service over self-hosting is that they have multiple servers all around the world that are configured to purely serve static content. They employ geographical targeting techniques on the DSN lookup, load balancing for stability and use Edge-Server technology to make sure that your content gets where it needs to be… and fast.
What A Self-Hosted CDN Is
A self-hosted CDN is one that you create for the purpose of serving up your static content using parallel connections. Normally it’s on the same server as the main domain and not duplicated across many servers and locations like a premium CDN is.
You could set it up to be in multiple locations but that would involve multiple servers and a way to make sure that the content on each server is the same.
Even a self-hosted system on your existing hosting account can still benefit your site a ton. Although you loose some of the features of a premium hosting service you still get 2 huge benefits.
- Your static content is still served from a cookieless domain
- It’s served from a different domain to your main domain and users benefit from parallel connections.
Speed Results Without Optimizations
 When I done a test on my site withWebPageTest.org the results I got were anF grade for almost everything. I expected bad results due to me turning off all the optimizations.
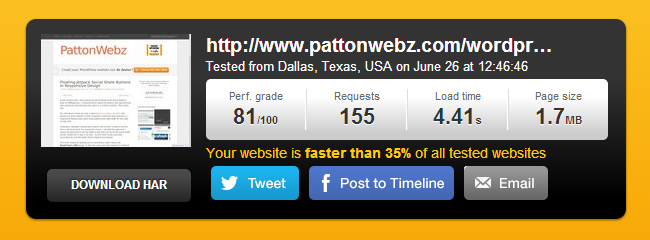
Doing multiple speed tests I received consistent scores like ones in the screenshot below. Pages are fully loaded in between 4 and 5 seconds which isn’t actually all that bad.
There’s 2 things that worry me about the results I get when I test my speed.
- “Your website is faster than 35% of all tested websites” that means more than half of the sites tested are faster than mine.
- “Load time 4.41s” – over 4 seconds is bad. Users drop off after a certain load time.
When I first heard of the drop-off it was after 6 seconds, then I heard 4, recently I heard it was just 3 seconds. Not sure what the currently accepted drop-off time is but the quicker it loads the better.
In my own tests I’ve actually found that as early as 2 seconds people can start to drop.
Create Self-Hosted CDN for W3 Total Cache
The performance and caching plugin W3 Total Cache makes it easy to configure WordPress to use a CDN – using a self-hosted or premium content delivery network.
Most of the work to make a CDN takes place at your hosting account and, because we’re using an origin push technique the plugin only needs an ftp user capable of accessing the files on your hosting service.
The first thing that I need to do is create a sub-domain to hold the files. I used to have Plesk panel installed on my server and when a sub-domain is created Plesk automatically adds an A record to the DNS for the new subdomain, I’m pretty surecPanel has a similar behavior.
You can still do all of this without access to any hosting panel if you have ssh access and are capable of setting up a virtual host, adding users and modifying DNS records.
Additional Domains
I’m going to actually create an additional 3 subdomains and point the virtual hosts to the exact same directory on the server as the primary sub-domain.
I initially planned to create 3 additional CNAME records (because W3 Total Cache suggests CNAMEs) and point them to the sub-domain domain. Instead I opted to use another 3 A records
There are other ways to configure your sub-domains but W3 suggests CNAME records. There is probably a reason why CNAME records are suggested over A records, but a CNAME requires an additional look-up to access and I wanted to eliminate that. You’ll see shortly why I’ve added the extra 3 sub-domains.
You need just a single sub-domain – it’s how most people do it – however I know that I have a lot of CSS & JS files on this site and I will want them to be served from different domains so they all benefit from paralleization.
A better course of action would be to combine and minify them all into as few files as possible but doing that gives me some huge files to serve.
 These are the sub-domains I ended up using. All 4 of them point to the same CDN directory on the server. This way it only takes a single user to push content to them yet it’s accessible from 4 different domains.
Once you have domains set up and a user that has access to them you’re ready to configure it in the W3 Total Cache plugin.
W3 Total Cache Self-Hosted CDN Settings
 On the General Settings tab of W3 Total Cache scroll down to the box that asks about your CDN type. Set it to self-hosted/ftp and then go to the CDN page and enter hostname and ftp details.
Most of the default settings are fine, I made a few minor adjustments to mine which you can see by clicking the thumbnail (sorry the screencapture had problems but you are able to see all the settings – bar the additional hostnames I entered).
Ordinarily people put in a single domain and that’s fine but because I’ve created multiple sub-domains for it I will enter all 4.
W3 Total Cache will use a different hostname for different files linked in different places. CSS will use 1 hostname and the JS files will use the other 3, depending on where they are linked in the file.

Before you turn on the CDN there is one thing left to do. You need to upload your files to your self-hosted CDN. This is the origin push I soke of earlier.
At the top of the CDN config page there are buttons which open windows that allow you to upload all your files in each file-group. Click each of the buttons and initiate the file transfer for them.
 This is what the upload windows look like, just click the blue button to start transfer.
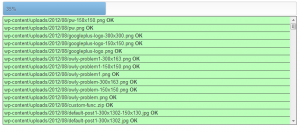 You should see the files upload in batches and go green, if any of the rows are red it means transfer failed.
Turn On Your Self-Hosted CDN
Once you’ve set everything up uploaded your files you’re ready to turn on the CDN.
Navigate to the General Settings page from W3 and set the CDN to Self-hosted / File Transfer Protocol Upload tick the Enabled checkbox and then click save.
At that point you’re now running your own CDN to serve your static content. Let’s check the speed of the site after activating the CDN and compare it to the score above.

One point better on the Performance Grade due to using the CDN and shaved almost a second off the load time. That puts the page below the suggested 4 second mark but it’s still slower than 67% of the pages the tested so I’m not happy with that. I want it faster.
Even if you get respectable pagespeed scores, like the one above, you should still strive to make it even faster. There’s still a lot I can do with the site to speed it up even more.
If you remember at the beginning of this post I told you that I had turned off all optimizations on this site to demo the benefits of a self-hosted CDN but how about I show you what the speed is like when I enable all of the standard server-side optimizations I perform?

See the difference? Still a similar amount of page requests, still the same page size but I save almost 4 seconds of time! That’s massive and it pushes me 15% below my holy grail target of 2 seconds. Plus it makes my site faster than 3/4 of the sites tested. That’s more like the kind of results I want to see.
Notice the performance grade isn’t much better, that’s because there’s still even more improvements I can make, like combining all the CSS files and JS files into as few files as I can and deferring the JS processing till the footer of the document.
Although I’ve yet to implement proper minification and combining of those files when I done a basic test the requests dropped to 90 and the size 1.1MB so it saves over 500k per load. Load time was 1.4 seconds.
Even when you get good scores there’s always ways to improve the speed of your pages a little more.