Adding SCSI Disks to VMWare Guest (CentOS 7.2)
After you apply the new disk(s) in VMWare, you need to re-scan the scsi bus.
First, find your scsi_host:
root@nfs1 ~# grep mpt /sys/class/scsi_host/host?/proc_name
/sys/class/scsi_host/host2/proc_name:mptspi
In this case, it’s “host2”
Trigger a re-scan of the scsi bus for “host2“:
# echo "- - -" > /sys/class/scsi_host/host2/scan
The hyphens represent controller,channel,lun, so – – – indicates all controllers, all channels and all luns should be scanned.
Check if the new disk(s) are found:
root@nfs1 ~# fdisk -l

Disk /dev/sda: 17.2 GB, 17179869184 bytes, 33554432 sectors
Units = sectors of 1 * 512 = 512 bytes
Sector size (logical/physical): 512 bytes / 512 bytes
I/O size (minimum/optimal): 512 bytes / 512 bytes
Disk label type: dos
Disk identifier: 0x000261b9

Device Boot Start End Blocks Id System
/dev/sda1 * 2048 1026047 512000 83 Linux
/dev/sda2 1026048 33554431 16264192 8e Linux LVM

Disk /dev/mapper/centos_vweb3-root: 14.9 GB, 14889779200 bytes, 29081600 sectors
Units = sectors of 1 * 512 = 512 bytes
Sector size (logical/physical): 512 bytes / 512 bytes
I/O size (minimum/optimal): 512 bytes / 512 bytes


Disk /dev/mapper/centos_vweb3-swap: 1719 MB, 1719664640 bytes, 3358720 sectors
Units = sectors of 1 * 512 = 512 bytes
Sector size (logical/physical): 512 bytes / 512 bytes
I/O size (minimum/optimal): 512 bytes / 512 bytes


Disk /dev/sdb: 85.9 GB, 85899345920 bytes, 167772160 sectors
Units = sectors of 1 * 512 = 512 bytes
Sector size (logical/physical): 512 bytes / 512 bytes
I/O size (minimum/optimal): 512 bytes / 512 bytes


Disk /dev/sdc: 53.7 GB, 53687091200 bytes, 104857600 sectors
Units = sectors of 1 * 512 = 512 bytes
Sector size (logical/physical): 512 bytes / 512 bytes
I/O size (minimum/optimal): 512 bytes / 512 bytes


Disk /dev/sdd: 37.6 GB, 37580963840 bytes, 73400320 sectors
Units = sectors of 1 * 512 = 512 bytes
Sector size (logical/physical): 512 bytes / 512 bytes
I/O size (minimum/optimal): 512 bytes / 512 bytes
We can see now there exists: /dev/sdb (80G), /dev/sdc (50G) & /dev/sdd (35G).
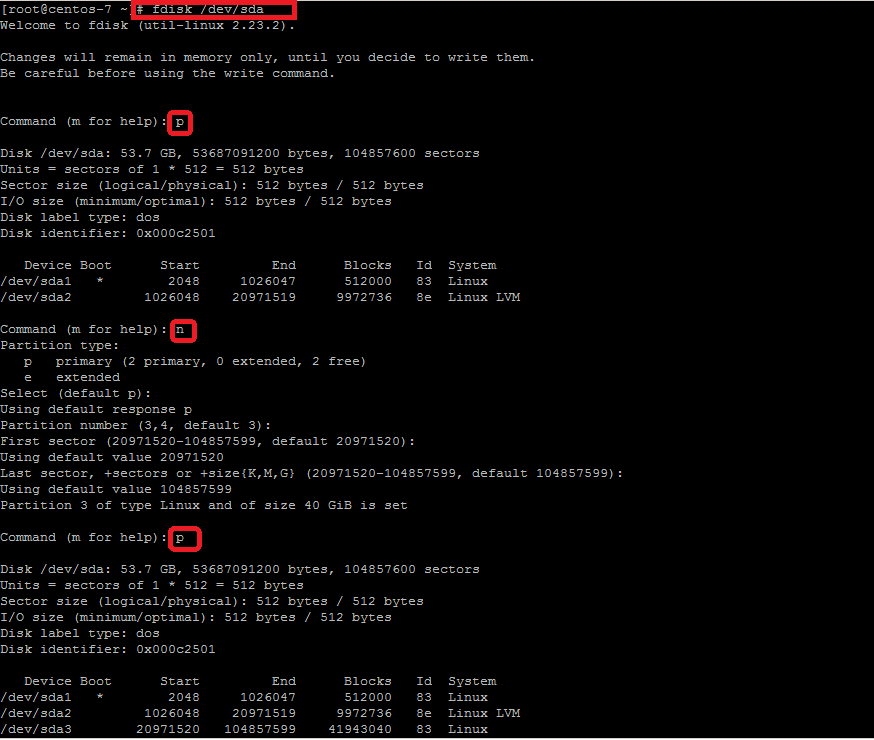
New Disk Partition:
Once you are able to see the increased disk space inside your system then the run the following command to format your disk for creating a new partition by following the steps to increase your physical disk volume.
# fdisk /dev/sdb

Welcome to fdisk (util-linux 2.23.2) press the 'm' key for help

Command (m for help): m
Command action
a toggle a bootable flag
b edit bsd disklabel
c toggle the dos compatibility flag
d delete a partition
g create a new empty GPT partition table
G create an IRIX (SGI) partition table
l list known partition types
m print this menu
n add a new partition
o create a new empty DOS partition table
p print the partition table
q quit without saving changes
s create a new empty Sun disklabel
t change a partition's system id
u change display/entry units
v verify the partition table
w write table to disk and exit
x extra functionality (experts only)

Command (m for help):
Type the ‘p‘ to print the current partition table then create a new primary partition by typing the ‘n‘ key and selecting the available sectors. Change the disk type to ‘Linux LVM‘ by using ‘t‘ command and selecting the code to ‘8e‘ or leave as it to its default type that is ‘83‘.
Now write the table to disk and exit by Entering ‘w‘ key as shown.
Command (m for help): w
The partition table has been altered!

Calling ioctl() to re-read partition table.
Syncing disks.
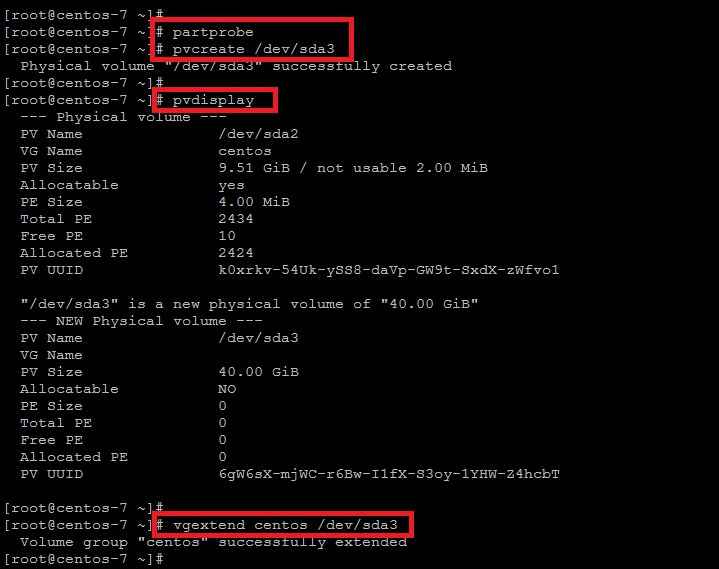
5)Creating Physical Volume:
As indicated above run the ‘partprobe’ or kpartx command so that the tables are ready to use and then create the new Physical Volume using the below commands.
# partprobe
You may need to give it a couple of minutes if you receive this Error:
# partprobe
Error: Error informing the kernel about modifications to partition /dev/sdb1 -- Device or resource busy. This means Linux won't know about any changes you made to /dev/sdb1 until you reboot -- so you shouldn't mount it or use it in any way before rebooting.
Error: Failed to add partition 1 (Device or resource busy)
To check the newly created volume run the following command to see if the new physical volume has been created and visible. After that we will extend the Volume Group ‘centos’ with the newly created Physical Volume as shown.
# pvdisplay
# pvcreate /dev/sdb1
  Physical volume "/dev/sdb1" successfully created
# pvdisplay

"/dev/sdb1" is a new physical volume of "25.00 GiB"
--- NEW Physical volume ---
PV Name /dev/sdb1
VG Name
PV Size 25.00 GiB
Allocatable NO
PE Size 0
Total PE 0
Free PE 0
Allocated PE 0
PV UUID bJcv9x-VbWQ-lF0v-ql5r-ig0N-w6rj-4sov4c
6) CREATING AN XFS FILE SYSTEM
- Main Features
-
XFS supports metadata journaling, which facilitates quicker crash recovery. The XFS file system can also be defragmented and enlarged while mounted and active. In addition, Red Hat Enterprise Linux 7 supports backup and restore utilities specific to XFS.
- Allocation Features
-
XFS features the following allocation schemes:
-
Extent-based allocation
-
Stripe-aware allocation policies
-
Delayed allocation
-
Space pre-allocation
Delayed allocation and other performance optimizations affect XFS the same way that they do ext4. Namely, a program’s writes to an XFS file system are not guaranteed to be on-disk unless the program issues anfsync()call afterwards.For more information on the implications of delayed allocation on a file system (ext4 and XFS), refer to Allocation Features in Chapter 5, The Ext4 File System.NOTE
Creating or expanding files occasionally fails with an unexpected ENOSPC write failure even though the disk space appears to be sufficient. This is due to XFS’s performance-oriented design. In practice, it does not become a problem since it only occurs if remaining space is only a few blocks. -
- Other XFS Features
-
The XFS file system also supports the following:
- Extended attributes (
xattr) -
This allows the system to associate several additional name/value pairs per file. It is enabled by default.
- Quota journaling
-
This avoids the need for lengthy quota consistency checks after a crash.
- Project/directory quotas
-
This allows quota restrictions over a directory tree.
- Subsecond timestamps
-
This allows timestamps to go to the subsecond.
- Extended attributes (
- Default
atimebehavior isrelatime -
Relatimeis on by default for XFS. It has almost no overhead compared tonoatimewhile still maintaining saneatimevalues.
mkfs.xfs /dev/device command. In general, the default options are optimal for common use.mkfs.xfs on a block device containing an existing file system, use the -f option to force an overwrite of that file system.
Example 6.1. mkfs.xfs command output
mkfs.xfs command:# mkfs.xfs /dev/sdb1 mkfs.xfs: /dev/sdb1 appears to contain an existing filesystem (LVM2_member). mkfs.xfs: Use the -f option to force overwrite. # mkfs.xfs -f /dev/sdb1 meta-data=/dev/sdb1 isize=256 agcount=4, agsize=1638336 blks = sectsz=512 attr=2, projid32bit=1 = crc=0 finobt=0 data = bsize=4096 blocks=6553344, imaxpct=25 = sunit=0 swidth=0 blks naming =version 2 bsize=4096 ascii-ci=0 ftype=0 log =internal log bsize=4096 blocks=3199, version=2 = sectsz=512 sunit=0 blks, lazy-count=1 realtime =none extsz=4096 blocks=0, rtextents=0
Test mount:
# mount -t xfs /dev/sdb1 /mnt
# umount /mnt
Add New Disk to /etc/fstab:
# vi /etc/fstab
Add the new disk to the fstab:
/dev/sdb1 /var/lib/mysql xfs defaults 0 0
TO Extend a FS, continue….
# vgextend centos /dev/sdb1
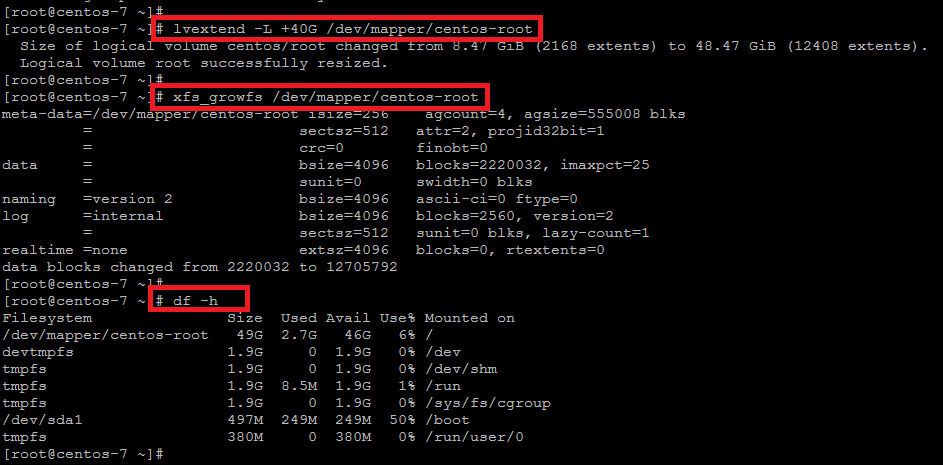
6) Extending Logical Volume:
Now we will extend the Logical Volume to increase the disk space on it using the the below command.
# lvextend -L +40G /dev/mapper/centos-root
Once you get the successfully increased message, run the command as shown below to extend the size of your logical volume .
# xfs_growfs /dev/mapper/centos-root
The size of the ‘/’ partition has been increased successfully, you can check the size of your disk drives by using the ‘df’ command as shown.
Conclusion:
Managing disk partitions in Linux CentOS 7 is a simple process to increase the disk space of any of your logical volumes by using the steps as described in this article. You don’t need to give your production server’s reboot for this purpose but simply rescan your SCSi devices and expand your desired LVM
Notes also taken from a linoxide post here: http://linoxide.com/linux-how-to/add-new-disk-centos-7-without-rebooting/